
Skip to content
EG Ajour Help

EG Ajour Help

  • GuidesExpand
    • Administration
    • Box
    • AjourInspect & QA
    • FM
    • Tender
    • App
    • Generally
  • English
  • Dansk
EG Ajour Help
EG Ajour Help

Administration

18
  • Access request
  • Administration module
  • Archive/Deactivate, activate or delete a project
  • Buy licenses (Add-on purchase)
  • Change the e-mail address of an existing user
  • Create a new user
  • Create project
  • Deactivate user
  • Edit project information
  • Explanation of license types
  • Give an existing user access to a project
  • Merge two companies
  • Remove a user from a project
  • Resend activation mail and New password
  • Role standards
  • Share your license with other Ajour systems
  • The My settings menu
  • User permissions in EG Ajour

App

28
  • Activating and using Tablet mode (App)
  • Download the EG Ajour app
  • EG Ajour app version App Store / Google Play
  • Log in to the EG Ajour app
  • Settings (App)
  • The app’s buttons or action options are not displayed correctly
  • The Menu function
  • App - Box
    • Download, Rename and Delete files (App)
    • Search for files (App)
    • Sort files (App)
    • Upload file or photo (App)
  • App - Inspect & QA
    • Add comment to a registration (App)
    • Add registration on registration drawing (app)
    • Add registration without registration drawing (app)
    • Camera – with and without “Enhanced camera”
    • Change receiver on a registration (App)
    • Change type on a registration (App)
    • Create blueprint (App)
    • Delete or hide registration (App)
    • Edit registration photo (app)
    • Filtering registrations
    • Forward registration (App)
    • Move registration
    • Search by registration number
    • Status on a registration (App)
  • Synchronization of EG Ajour app
    • Synchronization conflicts in the EG Ajour app
    • Synchronization error: Authentication error – check username and password (App)
    • Synchronization of the EG Ajour app

Box

14
  • BIMviewer
  • Blueprints on project
  • Create and manage folder templates
  • Download files from Box
  • Edit assignment
  • File management in AjourBox
  • File review
  • Folder log
  • Folder types in AjourBox
  • General information about AjourBox
  • Manage folders on the project
  • Revision and version control
  • Search functions in AjourBox
  • Upload of .zip file in AjourBox

FM

6
  • BE-card reports
  • Copy all BE-groups and cards from one project to another
  • Create new BE-card
  • Fill in a BE-card
  • Operating plan
  • Workflow with BE-cards

Generally

16
  • Allowed file types (current list) 
  • Create a new user in Ajour System 
  • Definition of registration types. 
  • EG Sasha in EG Ajour 
  • Email notifications 
  • Find your system name for EG Ajour 
  • Home / Dashboard 
  • Log in to an Ajour system (Web) 
  • Login page (Web) 
  • My settings
  • Overview of elements in a registration 
  • Reset Password 
  • Switch between multiple Ajour systems (web and app)
  • The modules (Web) 
  • Troubleshooting: You do not receive an email from EG Ajour 
  • Where can you get the best help or support?

Inspect & QA

30
  • Add comment to a registration
  • Bulk editing of registrations
  • Create registration
  • Deeplinking in AjourInspect & QA
  • Download registration images
  • Filtering, sorting and grouping
  • Print registration drawing
  • Print report
  • Registration statuses in EG Ajour Inspect & QA – what do they mean?
  • Registration types / Note types
  • Report generator
  • Status on registrations
  • Categories/shema
    • Categories/schema: Calculated scope
    • Categories/schema: Concept explanation
    • Categories/schema: Import and export control schema
    • Categories/schema: Print
    • Categories/schema: Project Setup
    • Categories/schema: System Setup
    • Copy content from a project group to another project
  • Manage a registration
    • Change deadline on a registration
    • Change groups on a registration
    • Change project level on a registration
    • Change receiver on a registration
    • Change registration type
    • Copy registration
    • Edit registration
    • Forward registration
    • Hide or restore registration
    • Labels
    • Show registration log on a registration

Tender

22
  • Cancel tender
  • Change offer responsible / bidder on a contract
  • Complete selection
  • Create and manage a tender in AjourTender
  • Create and upload an ESPD (Tender administrator)
  • Download tender materials
  • Download, complete and upload ESPD (Bidder)
  • Edit a tender
  • Filter and sort tenders in AjourTender
  • Invitation to a tender
  • Inviting users to a tender
  • Log (Tender log)
  • Overview and Filter
  • Participate in a public tender
  • Questions / Answers
  • Reopening of tenders
  • Roles in a tender
  • Send Result List
  • Status of a tender
  • Upload tender/PQ
  • Correction sheet
    • Send out correction sheet (Tender administrator)
    • View correction sheets as a bidder
View Categories
  • Home
  • Docs
  • Administration
  • Access request

Access request

5 min read

0:00 / 5:01
  • View as Markdown Open this page as plain Markdown (opens in a new tab)
  • Open in ChatGPT Ask questions about this page (opens in a new tab)
  • Open in Claude Ask questions about this page (opens in a new tab)
  • Open in Google AI Studio Ask questions about this page (Google account required) (opens in a new tab)
Handling access requests in User administration #
Context #

This guide shows a complete flow in a web-based administration system, covering two perspectives: the user’s registration process from the login page and the administrator’s handling of incoming access requests. The flow runs from a new user’s self-registration to the final approval and creation in the system.

Relevance #

This guide is relevant when a new user wants access to the system and does not already have a user account. The administrator must then process the request, create a new company in the system if needed, and finally approve or reject access. The process ensures controlled user administration without bypassing the security layer.

Prerequisites and requirements #
For the new user: #
  • Access to the login page of the system
  • A valid e-mail address
  • Knowledge of the name of the project or unit you want access to
For the administrator: #
  • An active user account with administrator permissions (Level 1 / System Administrator or equivalent)
  • The permission “Receive user registration e-mails” must be enabled on your user account
  • The permission “Account” incl. “Change Permissions” and “Show all users” must be enabled
  • Access to User administration → Menu → Access request
Guide (step by step) #
New user: Submit an access request #

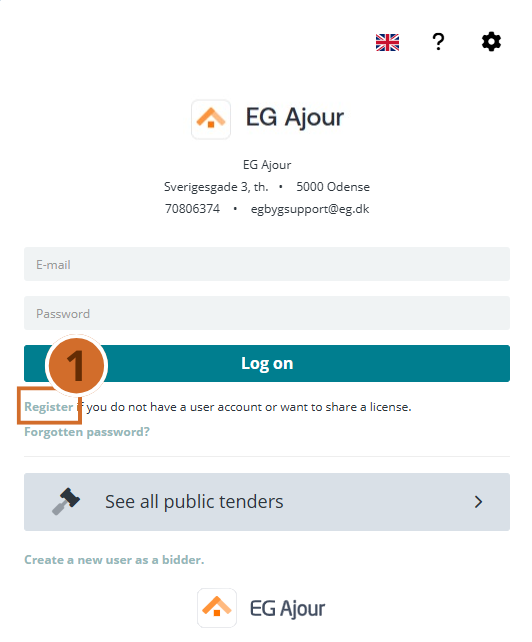
Step 1. – Go to the login page of the system. Click the “Register” link at the bottom of the page.

Tip: The link is typically located below the login button with the text “Register if you do not have a user account or want to share a license.”
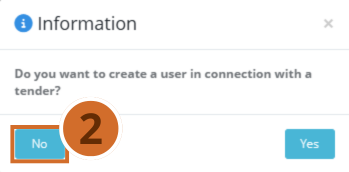
Step 2. – An information window appears with the question “Do you want to create a user in connection with a tender?”. Click “No” if you want access to the system in general and not via a specific tender.
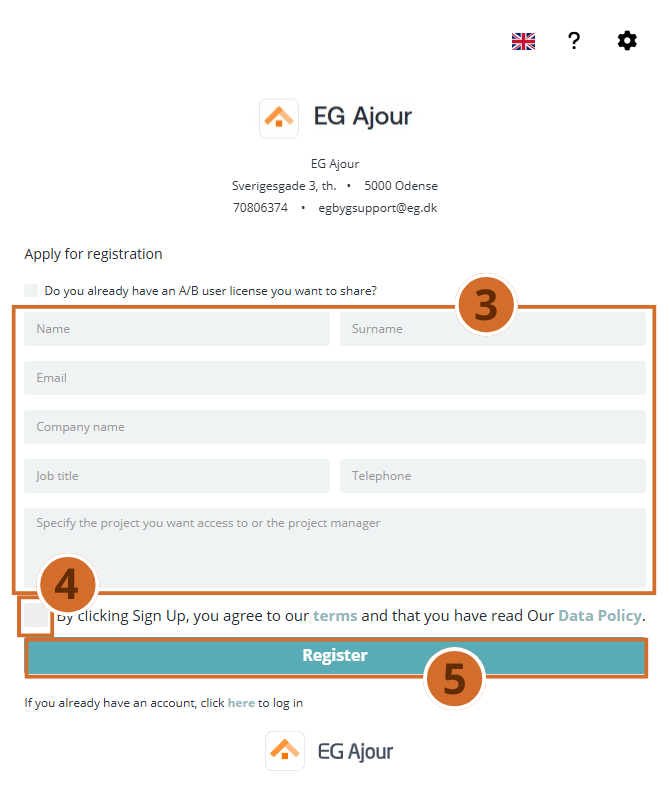
Step 3. – The registration form opens. Fill in the following fields:

  • First name and last name
  • E-mail address
  • Company name
  • Job title (optional)
  • Phone number (optional)
  • Briefly describe what you want access to in the text field at the bottom (e.g. “I would like access to the project [project name]”)

Step 4. – Select the checkbox “By clicking Register, you agree to our terms…”.

Step 5. – Click the “Register” button.

  • Result: Your request has now been sent to the system administrator, who will receive an e-mail with your details.
Administrator: Receive and process the request #

Step 6. – You receive an automatic e-mail with information about the new user, including name, e-mail, company and access description. Click the “Click here to go directly to Ajour” link in the e-mail, or log in manually.

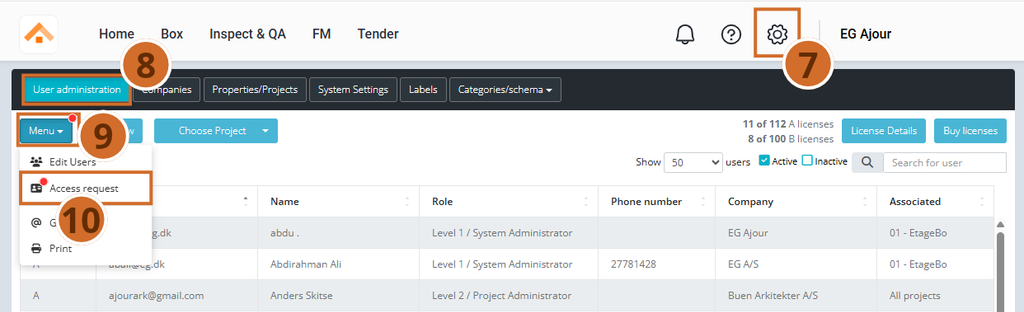
Step 7. – Click the gear icon in the top right corner of the system, and select “Administration” in the drop-down menu.

Step 8. – Click the “User administration” tab in the top navigation bar.

Step 9. – Click the “Menu” button in the top left corner.

Step 10. – Select “Access request” in the menu.

Tip: If there are pending requests, a red icon is shown on the Menu button.
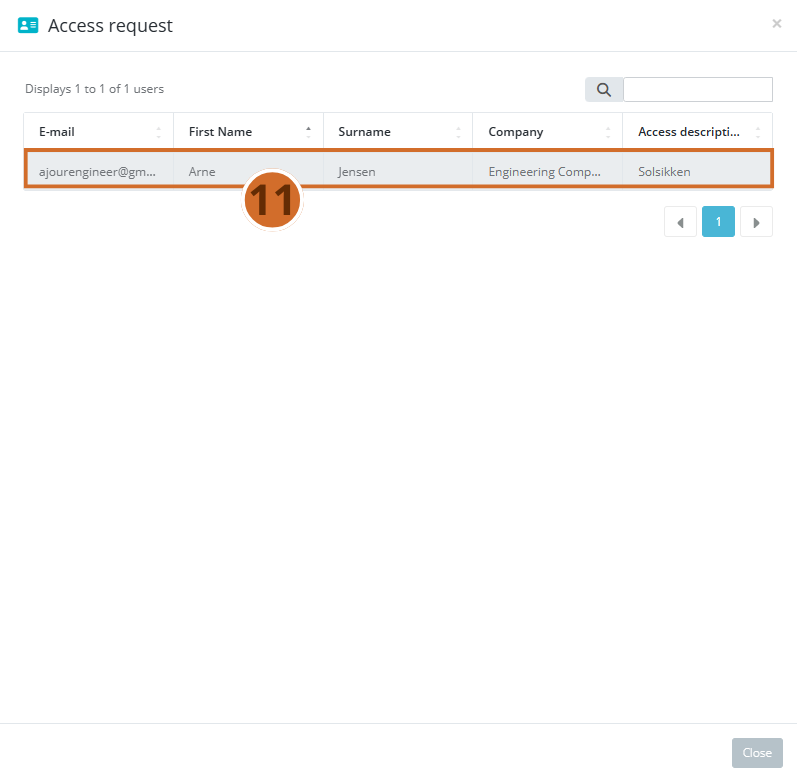
Step 11. – The “Access request” dialog box opens and shows a list of pending requests. Click the relevant user in the list to open the user data.
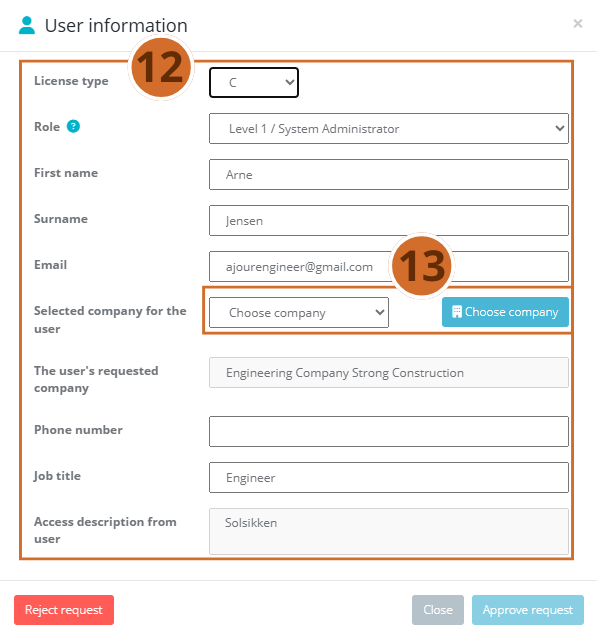
Step 12. – Review the user information in the “User information” dialog box:

  • Check the name, e-mail and access description
  • Check the “The user’s requested company” field

Step 13. – Under the “Selected company for the user” field, you must link the user to a company. Click the “Select company” button.

Important: The user cannot be approved unless a company has been selected.
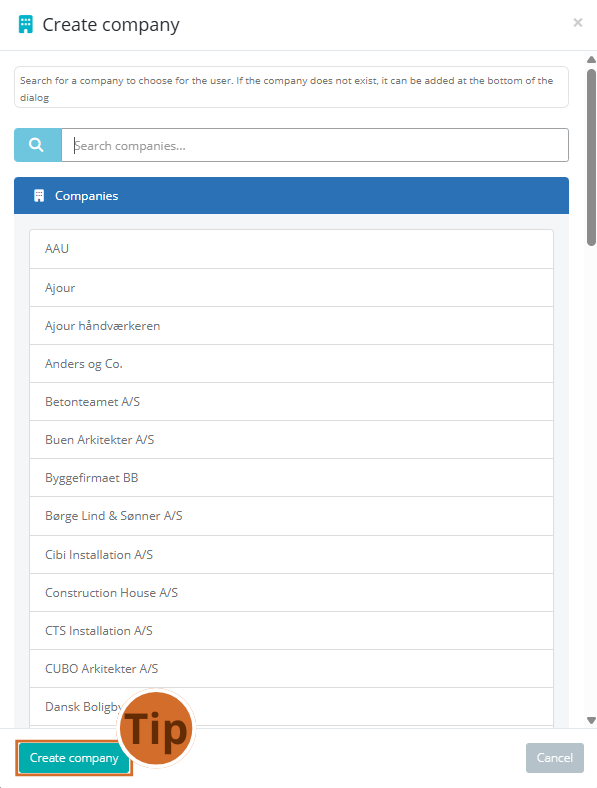
Step 14. – In the “Create company” dialog, existing companies are shown. Select the relevant company from the list by clicking it.

Tip: If the company does not already exist in the system, click “Create company” at the bottom of the dialog, fill in the company details (at least the name is required), and click “Save”. Then select the newly created company.
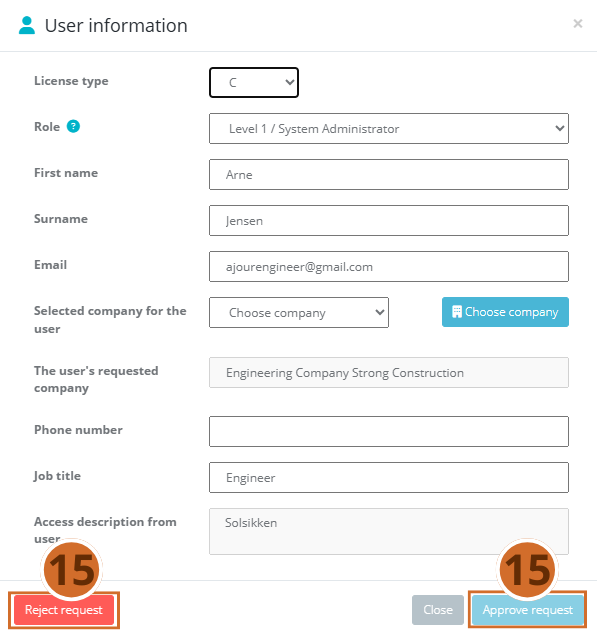
Step 15. – When the company has been selected and all details are correct, choose one of the following actions:

ButtonAction
Approve requestThe user is created and activated in the system
Reject requestThe request is rejected and the user is not created

Warning: Rejection cannot be undone. The user must then register again.
Step 16. – After approval, the dialog closes, and the new user is now shown in the user list under “User administration” with the assigned license, role and company.

Next steps #

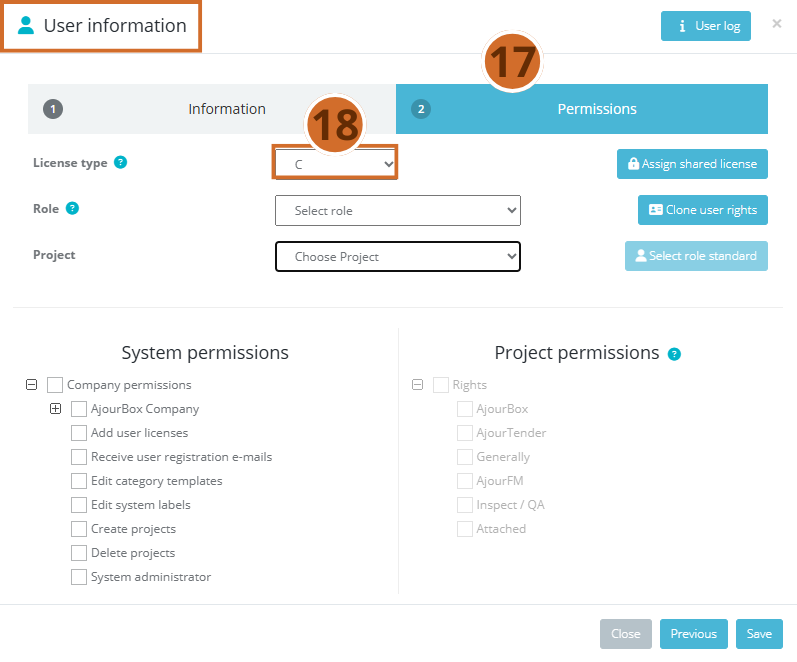
Step 17. – Adjust the user’s permissions — Open the new user in “User administration” and adjust system and project permissions as needed via the “Permissions” tab

Step 18. – Assign the user the license type required for the user to do their work. See the guide “Explanation of license types” to see what A, B and C licenses can do.
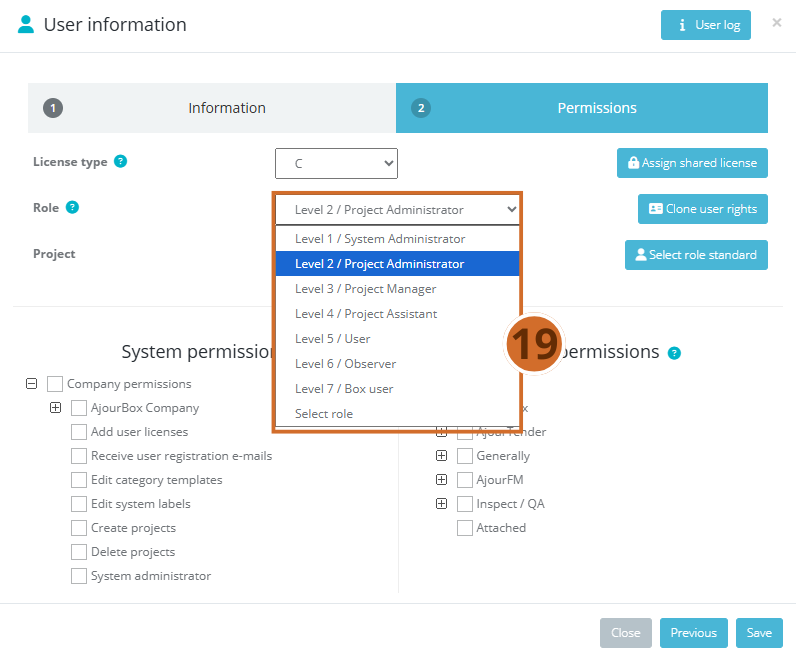
Step 19. – Assign the new user a “Role” so the user gets the permissions needed for the work the user will perform on the project.
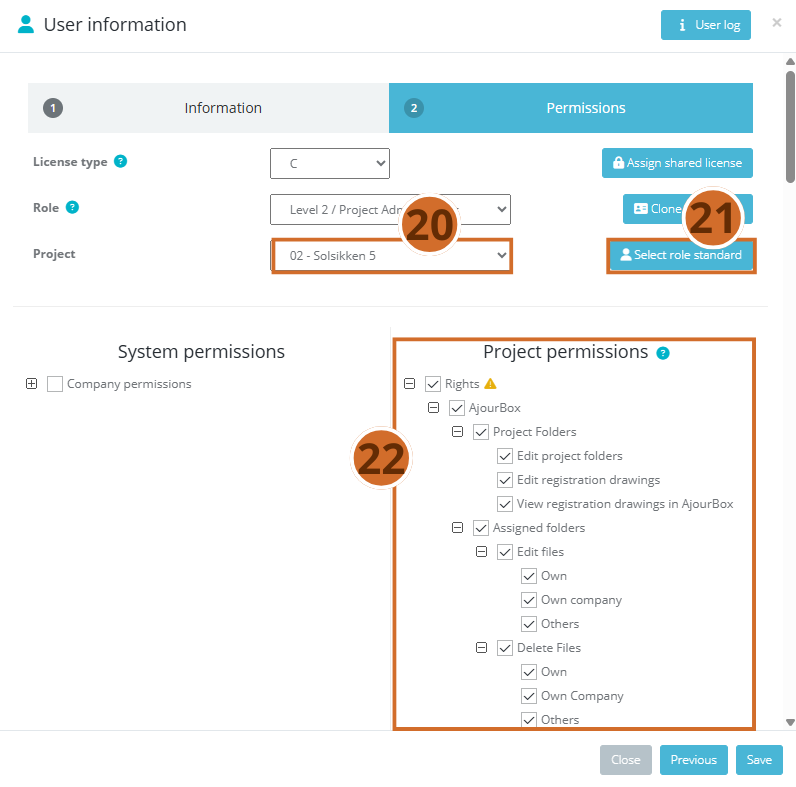
Step 20. – Link the user to specific projects — Go to the user’s profile and specify which projects the user must have access to under the “Project” field.

Step 21. – Click the “Select role standard” button to assign the user the selected “Role” on the selected project(s).

Step 22. If the user needs extra permissions beyond what the role standard contains, they can be added manually in the permission tree by selecting the checkbox next to the relevant permissions.
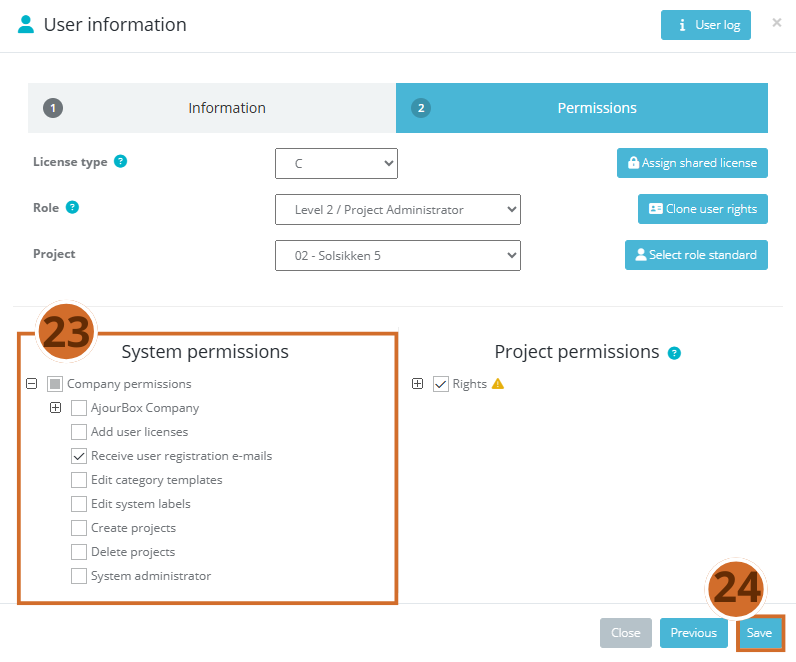
Step 23. – Configure e-mail notifications — Make sure the right administrators have enabled the permission “Receive user registration e-mails”, so future notifications are not overlooked.

Step 24. – Finish by clicking the “Save” button.
What are your Feelings

  • Happy
  • Normal
  • Sad
User permissions in EG AjourAdministration module

Powered by BetterDocs

Table of Contents
  • Handling access requests in User administration
  • Context
  • Relevance
  • Prerequisites and requirements
  • For the new user:
  • For the administrator:
  • Guide (step by step)
  • New user: Submit an access request
  • Administrator: Receive and process the request
  • Next steps

© 2026 EG Ajour Help

  • Guides
    • Administration
    • Box
    • AjourInspect & QA
    • FM
    • Tender
    • App
    • Generally
  • English
  • Dansk